반응형


📌 OSPF란

OSPF는 링크 상태 프로토콜이며, 링크는 라우터 인터페이스라고 볼 수 있습니다. 인터페이스에 대한 설명에는 인터페이스의 IP 주소, 마스크, 연결된 네트워크 유형, 해당 네트워크에 연결된 라우터 등이 포함됩니다.

OSPF는 Open Shortest Path First 알고리즘을 사용하여 모든 대상에 도달하기 위한 최단 경로를 구축하고 계산합니다. 최단 경로는 Dijkstra 알고리즘을 사용하여 계산됩니다.

  1. OSPF 초기 구성 시 또는 라우팅 정보의 변경으로 인해 라우터는 링크 상태 알림을 생성합니다. 이 알림은 해당 라우터에 있는 모든 링크 상태에 나타냅니다.
  2. 모든 라우터는 플러딩을 통해 링크 상태를 교환합니다. 링크 상태 업데이트를 수신하는 각 라우터는 링크 상태 데이터베이스에 복사본을 저장한 다음 다른 라우터에 업데이트를 전파합니다.
  3. 각 라우터의 데이터베이스가 완료되면 라우터는 모든 대상에 대한 최단 경로 트리를 계산합니다. 라우터는 최단 경로 트리, 대상, 관련 비용을 계산하기 위해 Dijkstra 알고리즘을 사용하고 해당 대상에 도달하기 위한 다음 홉을 사용하여 IP 라우팅 테이블을 형성합니다.
  4. OSPF 네트워크에서 링크 비용 또는 네트워크 추가 또는 삭제와 같은 변경 사항이 발생하지 않는 경우 OSPF는 자동으로 실행됩니다. 변경 사항은 링크 상태 패킷을 통해 전달되며, 최단 경로를 찾기 위해 Dijkstra 알고리즘이 다시 계산됩니다.

📌 OSPF 장점

  • OSPF를 사용하는 경우 홉 수에 제한이 없습니다.
  • VLSM를 적용하여 IP 주소 할당이 매우 유용합니다.
  • OSPF는 멀티캐스트를 사용하여 링크 상태 업데이트를 전송합니다. 이렇게 하면 OSPF 패킷을 수신하지 않는 라우터에서 프로세스 리소스 사용이 줄어듭니다. 주기적으로 업데이트가 전송되는 것이 아니라 라우팅 변경이 발생하는 경우에만 업데이트가 전송됩니다. 따라서 효율적인 대역폭이 보장됩니다.
  • OSPF는 라우팅 변경 사항이 주기적으로 전파되는 것이 아니라 즉시 전파됩니다.
  • OSPF는 트래픽을 로드 밸런싱합니다.
  • OSPF는 라우터를 영역으로 나눌 수 있습니다. 이를 통해 전체 네트워크에서 링크 상태 업데이트가 급증하는 것을 제한할 수 있습니다. 또한 경로를 수집하고 서브넷 정보의 불필요한 전파를 줄이는 메커니즘을 제공합니다.
  • OSPF는 다양한 비밀번호 인증 방법을 통해 라우팅 인증을 허용합니다.
  • OSPF는 태킹을 이용하여, BGP같은 외부 경로 프로토콜에서 들어온 경로를 추적할수 있습니다.

📌 OSPF 구성

R1(config)# router ospf <process-id>
R1(config)# network <network or IP address> <mask> <area-id>

예시)
RTA(config)# router ospf 100 
RTA(config)# network 192.168.0.4 0.0.255.255 area 0.0.0.0 
RTA(config)# network 192.168.0.3 0.0.0.0 area 23
  • OSPF process-id는 라우터에 로컬인 숫자 값입니다. 다른 라우터의 process-id와 일치하지 않아도 됩니다.
  • 동일한 라우터에서 여러 OSPF 프로세스를 실행할 수는 있지만 라우터에 추가 오버헤드를 추가하는 여러 데이터베이스 인스턴스를 생성하므로 권장되지 않습니다

📌 OSPF 인증

  • 라우터가 사전 정의된 비밀번호를 기반으로 라우팅 도메인에 참여할 수 있도록 OSPF 패킷을 인증할 수 있습니다.
  • 기본적으로 라우터는 Null 인증을 사용하며, 이로 인해 네트워크를 통한 라우팅 교환이 인증되지 않습니다. 두 가지 인증 방법이 있습니다. 단순 비밀번호 인증 및 Message Digest 인증(MD-5)입니다.
**단순 비밀번호 인증**
R1(config)# ip ospf authentication-key key  (특정 인터페이스 아래에 있음)
R1(config)# area area-id authentication. (이 값은 아래에 router ospf <process-id>있음)

예시1)
RTA(config)# interface Ethernet0
RTA(config)# ip ospf authentication-key mypassword
예시2)
RTA(config)# router ospf 10 network 10.0.0.0 0.0.255.255 area 0 
RTA(config)# area 0 authentication
**Message Digest 인증**
R1(config)# ip ospf message-digest-key key-id md5 key  (인터페이스 아래에 사용) 
R1(config)# area area-id authentication message-digest (아래에서 router ospf <process-id>사용)

예시1)
RTA(config)# interface Ethernet0
RTA(config)# ip ospf message-digest-key 10 md5 mypassword 
예시2)
RTA(config)# router ospf 10 network 10.0.0.0 0.0.255.255 area 0 
RTA(config)# area 0 authentication message-digest 

📌 OSPF 백본 및 Area 0

  • 두개 이상의 영역이 설정된 경우 꼭 Area 0이 존재해야합니다. 이를 백본이라고 합니다.
  • 백본은 모든 Area의 중앙에 있어야 합니다.
  • 백본은 모든 Area의 라우팅 정보를 주입하고 다른 Area로 전파합니다.
  • Area내에서 생성된 경로는 라우팅 테이블에서 O로 표시가되고, 다른 Area에서 시작되는 경로는 inter-area또는 라우팅 테이블에서 O IA로 표시 됩니다.
  • 다른 라우팅 프로토콜에서 시작되고 재배포를 통해 OSPF에 주입되는 경로를 external routes라고 말하고, 라우팅 테이블에서 O E1, O E1로 표시됩니다.

📌 가상 링크

  • 백본에 물리적으로 연결되지 않은 영역을 가상으로 연결
  • Area 0의 불연속성이 발생하는 경우 백본 패치

Area 0에 물리적으로 연결되지 않은 경우 가상 링크를 사용하여 다른 Area 라우팅 경로를 제공합니다.

가상 링크는 하나의 ABR이 백본에 연결된 공통 영역이 있는 두 ABR간 설정되어야 합니다.

가상 링크를 구성하려면 RTA, RTB 모두에게 설정
R1(config)# area <area-id> virtual-link <RID>

예시)
RTA(config)# router ospf 10 area 2 virtual-link 10.0.0.22 
RTB(config)# router ospf 10 area 2 virtual-link 10.0.0.11
  • OSPF를 사용하다보면 두 개의 다른 OSPF 백본 Area 0 이 있는 네트워크를 연결하려는 경우가 있습니다. 이런 경우 서로 존재하지않은 Area를 만들어서 서로 가상링크로 연결하여 사용한다. 다른 경우 몇가지 라우터 장애로 인해 백본이 둘로 분할되는 경우에 대비하여 이중화를 위해 가상 링크를 이용합니다.

📌 Neighbor

  • 세그먼트를 공유하는 라우터는 서로간에 neighbor라고 합니다. Neighbor는 Hello 프로토콜을 통해 맺어집니다. Hello 패킷은 멀티캐스트를 통해 각 인터페이스에서 주기적으로 전송됩니다.
  • 라우터는 인접한 Hello 패킷에 나열되는 즉시 인접한 라우터가 됩니다.
  • Area-id : 공통 세그먼트가 있는 두 라우터이며, 해당 인터페이스는 해당 세그먼트의 동일한 영역에 속해야 합니다. 인터페이스는 같은 네트워크 서브넷을 가져야합니다.
  • Authentication : OSPF를 사용하면 특정 Area에 대한 비밀번호의 설정이 가능합니다. 네이버가 되려는 라우터는 특정 세그먼트에서 동일한 비밀번호를 교환해야 합니다.
  • Hello and Dead Intervals : OSPF는 각 세그먼트에서 Hello 패킷을 교환합니다. 이는 세그먼트에서 라우터의 존재를 확인하고 멀티 액세스 세그먼트에서 지정 라우터(DR)를 선택하기 위해 라우터에서 사용하는 keepalive 형식입니다.
  • Hello 패킷은 라우터가 OSPF 인터페이스에서 전송하는 Hello 패킷 간의 시간(초)을 지정합니다.
  • Dead 간격은 인접 디바이스에서 OSPF 라우터의 Hello 다운을 선언하기 전에 라우터 패킷이 표시되지 않은 시간(초)입니다.
  • OSPF에서는 이러한 간격이 두 네이버 간에 정확히 동일해야 합니다. 이러한 간격이 서로 다른 경우 이러한 라우터는 특정 세그먼트에서 인접한 라우터가 되지 않습니다. 이러한 타이머를 설정하는 데 사용되는 라우터 인터페이스 명령입니다.
R1(config)# ip ospf hello-interval seconds
R1(config)# ip ospf dead-interval seconds
  • Stub area flag : 두 라우터가 인접 디바이스가 되려면 패킷의 stub area Hello 플래그에 동의해야 합니다. stub area은 이후 섹션에서 설명합니다. stub area의 정의는 인접한 라우터 선택 프로세스에 영향을 미칩니다.


참고자료

https://www.cisco.com/c/en/us/support/docs/ip/open-shortest-path-first-ospf/7039-1.html

반응형
반응형


📌 IP SLA, Track

참고자료

- https://www.cisco.com/c/en/us/support/docs/smb/switches/cisco-550x-series-stackable-managed-switches/smb5797-configure-ip-sla-tracking-for-ipv4-static-routes-on-an-sg550.html


  • 물리 링크는 살아 있는데 Peer 장비와 통신이 안되는 경우 icmp 패킷을 보내 강제적으로 물리 링크 Down
  • 상대방 장비로 라우팅 되어있는 상태일 때 링크를 Down 시켜 이중화 장비로 라우팅 전환

참고 해당 IP SLA 작업이 설정중이거나 인터페이스에 설정이 안되더라도 상태는 UP으로 표시됩니다.


상태 체크시 응답 코드 내용 (Latest operation return code)

Operation Return Code Track Operation State
OK Up
Error Down
  • SLA Operation State - 작업이 즉시 시작됨을 의미하는 Scheduled 또는 생성되었지만 활성화되지 않았음을 의미하는 Pending입니다.
  • Timeout value - ICMP 에코 응답 메시지 또는 ICMP 오류 메시지를 기다리는 간격 시간을 지정합니다.
  • Return Code - 작업이 완료된 후 다음에 따라 작업 Return Code가 설정됩니다.
  • ICMP Echo reply has been received - 반송 코드가 OK로 설정되었습니다.
  • ICMP Error reply has been received - 반환 코드가 오류로 설정되었습니다.
  • No any ICMP reply has been received - 반환 코드가 오류로 설정되었습니다.
  • Configured Source IP address or Source interface is not accessible - 반환 코드가 오류로 설정되었습니다.
  • Tracker - 작업 결과를 추적합니다.
  • Delay - IP SLA 작업 결과 추적 개체의 상태가 Y에서 X로 변경되어야 함을 나타내는 경우 추적 개체는 다음 작업을 수행합니다.


IP SLA 설정

  • ip sla <Number>
  • icmp-echo <체크 IP> <체크할 IP, 인터페이스>
  • frequency <icmp 체크 수=seconds>
  • ip sla schedule <sla number> life forever start-time now
    • 해당 sla 스케쥴이 즉시 동작합니다.
ip sla 1
 icmp-echo 192.168.1.2 source-interface Ethernet 0/1
 frequency 5
 ip sla schedule 1 life forever start-time now

ip sla 2
 icmp-echo 192.168.1.2 source-ip 192.168.2.100 next-hop-ip 192.168.2.1
 frequency 5
 ip sla schedule 2 life forever start-time now


Track 설정

  • track <track number> ip sla <sla number> reachability
  • delay down <seconds>
track 1 ip sla 1 reachability
 delay down 5


반응형

'Network > CISCO' 카테고리의 다른 글

[Network] CISCO - OSPF 설정 (1)  (0) 2024.04.28
[Network] CISCO - AAA 설정  (0) 2023.10.08
[Network] CISCO - Switch MAC차단 설정  (1) 2023.10.08
[Network] CISCO - IPSEC (IKEv2) 설정  (0) 2023.10.08
[Network] CISCO - IPSEC (IKEv1) 설정  (1) 2023.10.08
반응형


📌 AAA(Authentication, Authorization, and Accounting)


참고자료

- https://www.cisco.com/c/ko_kr/support/docs/security-vpn/terminal-access-controller-access-control-system-tacacs-/10384-security.html


  • AAA 활성화
    • 해당 명령이 활성화 될 때까지 다른 모든 AAA 관련 명령은 비활성화 상태
aaa new-model


  • 외부 AAA 서버 설정 (Radius, TACACS+)
    • key는 대소문자 구분
tacacs-server host <AAA 서버의 IP address> <key>
radius-server host <AAA 서버의 IP address> <key>


  • Authentication 구성 (인증)
    • 첫번째 Radius 서버로 인증됩니다. Radius 서버가 응답하지 않으면 장비에 로컬 데이터베이스가 사용됩니다. 로컬 인증의 경우 사용자 이름 및 비밀번호를 정의합니다.
    • local을 입력안해주면 로그인 불가
    • aaa authentication login default group <group name> local
aaa authentication login default group radius local
aaa authentication login default group tacacs+ local


  • Authorization 구성 (권한)
    • AAA 서버에서 권한 부여
    • aaa authorization exec default group <group name> local
aaa authorization exec default group radius local


  • Accounting 구성 (계정)
aaa accounting exec default start-stop group TACACS-SERVER-GROUP
aaa accounting commands 15 default start-stop group TACACS-SERVER-GROUP


  • AAA Group 구성
    • aaa group server tacacs+ <group name>
    • server-private <AAA server ip> key <tacacs key>
    • ip tacacs source-interface <source interface>
aaa group server tacacs+ group1
 server-private 192.168.0.1 key jinsu_tacacs
 ip tacacs source-interface Loopback0


  • AAA 예시 구성
aaa authentication login default group group1 local line
aaa authorization exec default group group1 local
aaa authorization commands 15 default group group1 local
aaa accountiong exec default start-stop group group1
aaa accountiong commands 1 default start-stop group group1
aaa accountiong commands 15 default start-stop group group1
aaa accountiong connection default start-stop group group1
aaa accountiong system default start-stop group group1


반응형
반응형


📌 CISCO - Switch MAC 차단 설정

참고자료

- https://www.cisco.com/c/en/us/td/docs/switches/lan/catalyst3750/software/release/12-2_50_se/configuration/guide/scg/swacl.html#wp1289037


  •  MAC Table에서 Static MAC을 설정하여 차단하기
mac address-table static 000f.1f43.e62a vlan 8 drop


  • ACL을 이용하여 MAC 허용, 차단 정책 설정하기
# 700-799 ACL 지원되는지 확인
access-list 700 deny NIC-mac 0000.0000.0000
access-list 700 permit 0000.0000.0000 ffff.ffff.ffff


반응형

'Network > CISCO' 카테고리의 다른 글

[Network] CISCO - IP SLA, Track 설정  (1) 2023.10.08
[Network] CISCO - AAA 설정  (0) 2023.10.08
[Network] CISCO - IPSEC (IKEv2) 설정  (0) 2023.10.08
[Network] CISCO - IPSEC (IKEv1) 설정  (1) 2023.10.08
[Network] CISCO - MTU 설정  (0) 2022.07.24
반응형


📌 Site to Site

참고자료

- https://www.cisco.com/c/en/us/td/docs/ios/12_2/security/command/reference/srfipsec.html#wp1017619


✏️ IKEv2 장점

  • IKEv2를 사용하면 인증에 EAP 사용가능
  • IKEv2는 시퀀스 번호와 확인 응답을 사용하여 신뢰성과 상태 관리 가능
  • 서비스 거부(DoS) 공격 복원력
  • IKEv2는 DPD(Dead Peer Detection) 및 NAT-T(Network Address Translation-Traversal)에 대한 기본 제공 지원을 제공합니다. URL 및 해시를 통해 인증서를 참조하여 조각화를 방지할 수 있습니다.


ISAKMP (Internet Key Exchange = IKEv2)

  • 1️⃣ 설정 장비#1 (정적 IP 설정)


참고자료

- https://www.cisco.com/en/US/docs/ios-xml/ios/sec_conn_ikevpn/configuration/15-1mt/Configuring_Internet_Key_Exchange_Version_2.html#GUID-8412F9B6-A3E2-4C28-A6E3-1A995FF71500


1. 인터페이스 구성(Lan, Wan)

  • 내부 및 외부 네트워크 peer 장비에 모두 연결되어 있는지 확인
  • 보통 Loopback 인터페이스를 만들어서 터널 사용
interface GigabitEthernet0/0
 description ## 외부 및 터널 IP ##
 ip address 172.17.1.1 255.255.255.252
 no shutdown

interface GigabitEthernet0/1
 description ## 내부 서버 IP ##
 ip address 10.20.10.1 255.255.255.0
 no shutdown


2. VPN 트래픽에 대한 ACL 구성

  • 터널을 위한 ACL 설정
access-list 100 remark tunnel ACL
access-list 100 permit gre host 172.17.1.1 host 172.17.1.2


3. IKEv2 Proposal 구성

  • no crypto ikev2 proposal default : 기본 proposal 지우기
  • crypto ikev2 proposal <proposal name>
  • encryption <encryption type>
    • 3des
    • aes-cbc-128
    • aes-cbc-192
    • aes-cbc-256
  • integrity <algorithm type>
    • SHA-2 family 256-bit
  • group <Diffie-Hellman (DH) group>
    • 1--768-bit DH
    • 2--1024-bit DH
    • 5--1536-bit DH
    • 14--Specifies the 2048-bit DH group.
    • 15--Specifies the 3072-bit DH group.
    • 16--Specifies the 4096-bit DH group.
    • 19--Specifies the 256-bit elliptic curve DH (ECDH) group.
    • 20--Specifies the 384-bit ECDH group.
    • 24--Specifies the 2048-bit DH group.
no crypto ikev2 proposal default
crypto ikev2 proposal jinsu_proposal
 encryption aes-cbc-256
 integrity sha256
 group 14


4. IKEv2 Policy 구성

  • no crypto ikev2 policy default : 기본 policy 지우기
  • crypto ikev2 policy <policy name>
  • proposal <proposal name>
no crypto ikev2 policy default
crypto ikev2 policy jinsu_policy
  proposal jinsu_proposal


5. IKEv2 Keyring 구성

  • crypto ikev2 keyring <keyring name>
  • peer <peer name>
  • address <상대방 외부 IP>
  • pre-shared-key <키 생성>
crypto ikev2 keyring jinsu_key
 peer jinsu_pr
  address 172.17.1.2
  pre-shared-key auhjinsu123


6. IKEv2 Profile 구성

  • crypto ikev2 profile <profile name>
  • match identity remote address <상대방 외부IP>
  • identity local address <내부 IP>
  • authentication local <authentication method>
  • authentication remote <authentication method>
  • keyring <keyring name>
crypto ikev2 profile jinsu_profile
 match identity remote address 172.17.1.2 255.255.255.255
 identity local address 172.17.1.1
 authentication local pre-share
 authentication remote pre-share
 keyring jinsu_key


7. transform-set 구성

  • 보안 프로토콜과 알고리즘 설정
  • crypto ipsec transform-set <Set-Name>
crypto ipsec transform-set auhjinsu esp-aes 256 esp-sha256-hmac
 mode tunnel


8. crypto map 생성 후 인터페이스에 설정

  • crypto map <Map Name> <Number> ipsec-isakmp
  • set peer <상대방 IP>
  • set transform-set <transform-set Name>
  • set ikev2-profile <profile name>
  • match address <ACL Number>
crypto map jinsu_map 10 ipsec-isakmp
 set peer 172.17.1.2
 set transform-set auhjinsu
 set ikev2-profile jinsu_profile
 match address 100
  • 터널 맺을 외부 인터페이스에 Map 설정
  • crypto map <Map Name>
interface GigabitEthernet0/0
 crypto map jinsu_map


9. 터널 인터페이스 설정

  • interface Tunnel<Number>
  • ip address <Tunnel IP>
  • tunnel source <외부 IP>
  • tunnel destination <상대방 source IP>
interface Tunnel12345
 ip address 10.255.100.1 255.255.255.252
 no ip redirects
 ip mtu 1400
 keepalive 3 3
 tunnel source 172.17.1.1
 tunnel destination 172.17.1.2


  • 2️⃣ 설정 장비#2 (정적 IP 설정)


1. 인터페이스 구성(Lan, Wan)

  • 내부 및 외부 네트워크 peer 장비에 모두 연결되어 있는지 확인
  • 보통 Loopback 인터페이스를 만들어서 터널 사용
interface GigabitEthernet0/0
 description ## 외부 및 터널 IP ##
 ip address 172.17.1.2 255.255.255.252
 no shutdown

interface GigabitEthernet0/1
 description ## 내부 서버 IP ##
 ip address 192.168.1.1 255.255.255.0
 no shutdown


2. IKEv2 Proposal 구성

  • no crypto ikev2 proposal default : 기본 proposal 지우기
  • crypto ikev2 proposal <proposal name>
  • encryption <encryption type>
    • 3des
    • aes-cbc-128
    • aes-cbc-192
    • aes-cbc-256
  • integrity <algorithm type>
    • SHA-2 family 256-bit
  • group <Diffie-Hellman (DH) group>
    • 1--768-bit DH
    • 2--1024-bit DH
    • 5--1536-bit DH
    • 14--Specifies the 2048-bit DH group.
    • 15--Specifies the 3072-bit DH group.
    • 16--Specifies the 4096-bit DH group.
    • 19--Specifies the 256-bit elliptic curve DH (ECDH) group.
    • 20--Specifies the 384-bit ECDH group.
    • 24--Specifies the 2048-bit DH group.
no crypto ikev2 proposal default
crypto ikev2 proposal jinsu_proposal
 encryption aes-cbc-256
 integrity sha256
 group 14


3. IKEv2 Policy 구성

  • no crypto ikev2 policy default : 기본 policy 지우기
  • crypto ikev2 policy <policy name>
  • proposal <proposal name>
no crypto ikev2 policy default
crypto ikev2 policy jinsu_policy
  proposal jinsu_proposal


4. IKEv2 Keyring 구성

  • crypto ikev2 keyring <keyring name>
  • peer <peer name>
  • address <모든 대역>
  • pre-shared-key <키 생성>
crypto ikev2 keyring jinsu_key
 peer jinsu_pr
  address 0.0.0.0 0.0.0.0
  pre-shared-key auhjinsu123


5. IKEv2 Profile 구성

  • crypto ikev2 profile <profile name>
  • match identity remote address <모든 대역>
  • identity local address <내부 IP>
  • authentication local <authentication method>
  • authentication remote <authentication method>
  • keyring <keyring name>
crypto ikev2 profile jinsu_profile
 match identity remote any
 identity local address 172.17.1.2
 authentication local pre-share
 authentication remote pre-share
 keyring jinsu_key


6. transform-set 구성

  • 보안 프로토콜과 알고리즘 설정
  • crypto ipsec transform-set <Set-Name>
crypto ipsec transform-set auhjinsu esp-aes 256 esp-sha256-hmac
 mode tunnel


7. crypto dynamic-map, crypto map 생성

  • crypto dynamic-map <Map Name> <Number>
  • set transform-set <transform-set Name>
  • set ikev2-profile <profile name>
crypto dynamic-map jinsu_map 10
 set transform-set auhjinsu
 set ikev2-profile jinsu_profile
  • crypto map <map name> <number> ipsec-isakmp dynamic <dynamic map name>
crypto map jinsu_dynamic_map 10 ipsec-isakmp dynamic jinsu_map


8. 인터페이스에 crypto map 설정

  • 터널 맺을 외부 인터페이스에 Map 설정
  • crypto map <Map Name>
interface GigabitEthernet0/0
 crypto map jinsu_dynamic_map


9. 터널 인터페이스 설정

  • interface Tunnel<Number>
  • ip address <Tunnel IP>
  • tunnel source <외부 IP>
  • tunnel destination <상대방 source IP>
interface Tunnel12345
 ip address 10.255.100.2 255.255.255.252
 no ip redirects
 ip mtu 1400
 keepalive 3 3
 tunnel source 172.17.1.2
 tunnel destination 172.17.1.1


📌 옵션

crypto isakmp invalid-spi-recovery
crypto isakmp keepalive 60
  • lifetime seconds
    • 시간이 지정된 수명(초)이 경과하면 ipsec이 해제됩니다.
  • lifetime kilobytes
    • 트래픽 볼륨 수명으로 인해 지정된 트래픽 양(KB)이 보안 연결 키로 보호된 후 보안 연결 시간이 초과됩니다.
crypto ipsec security-association lifetime seconds 43200
crypto ipsec security-association lifetime kilobytes 10000000
crypto ipsec security-association replay disable
crypto ipsec security-association replay window-size 1024


반응형

'Network > CISCO' 카테고리의 다른 글

[Network] CISCO - AAA 설정  (0) 2023.10.08
[Network] CISCO - Switch MAC차단 설정  (1) 2023.10.08
[Network] CISCO - IPSEC (IKEv1) 설정  (1) 2023.10.08
[Network] CISCO - MTU 설정  (0) 2022.07.24
[Network] CISCO - EtherChannel 설정  (0) 2022.07.24
반응형


📌 Site to Site

참고자료

- https://www.cisco.com/c/en/us/td/docs/ios/12_2/security/command/reference/srfipsec.html#wp1017619


ISAKMP (Internet Key Exchange = IKEv1)

  • 1️⃣ 설정 장비#1 (정적 IP 설정)

참고자료

- https://www.cisco.com/c/ko_kr/support/docs/security-vpn/ipsec-negotiation-ike-protocols/119425-configure-ipsec-00.html


1. 인터페이스 구성(Lan, Wan)

  • 내부 및 외부 네트워크 peer 장비에 모두 연결되어 있는지 확인
  • 보통 Loopback 인터페이스를 만들어서 터널 사용
interface GigabitEthernet0/0
 description ## 외부 및 터널 IP ##
 ip address 172.17.1.1 255.255.255.252
 no shutdown
!
interface GigabitEthernet0/1
 description ## 내부 서버 IP ##
 ip address 10.20.10.1 255.255.255.0
 no shutdown


2. ISAKMP(IKEv1) 정책 구성

  • crypto isakmp policy <priority> : 우선순위
  • encr aes 192 : 고급 암호화 192 bits.
  • authentication pre-share : 사전 공유키 [default]
  • group 2 : Group 2 (1024-bit)
  • hash : sha (default)
  • lifetime : (86400 seconds = default)
crypto isakmp policy 10
 encr aes 192
 authentication pre-share
 group 2


3. 암호화 ISAKMP 키 구성

  • crypto isakmp key <key 값> address <상대방 IP>
crypto isakmp key auhjinsu123 address 172.17.1.2


4. VPN 트래픽에 대한 ACL 구성

  • 터널을 위한 ACL 설정
access-list 100 remark tunnel ACL
access-list 100 permit gre host 172.17.1.1 host 172.17.1.2


5. transform-set 구성

  • 보안 프로토콜과 알고리즘 설정
  • crypto ipsec transform-set <Set-Name>
crypto ipsec transform-set auhjinsu esp-aes 192 esp-sha-hmac
 mode tunnel


6. Crypto map 구성 후 인터페이스에 적용

  • crypto map <Map Name> <Number> ipsec-isakmp
  • set peer <상대방 IP>
  • set transform-set <transform-set Name>
  • match address <ACL Number>
crypto map jinsu_map 10 ipsec-isakmp
 set peer 172.17.1.2
 set transform-set auhjinsu
 match address 100
  • 터널 맺을 외부 인터페이스에 Map 설정
  • crypto map <Map Name>
interface GigabitEthernet0/0
 crypto map jinsu_map


7. 터널 인터페이스 설정

  • interface Tunnel<Number>
  • ip address <Tunnel IP>
  • tunnel source <외부 IP>
  • tunnel destination <상대방 source IP>
interface Tunnel12345
 ip address 10.255.100.1 255.255.255.252
 no ip redirects
 ip mtu 1400
 keepalive 3 3
 tunnel source 172.17.1.1
 tunnel destination 172.17.1.2


  • 2️⃣ 설정 장비#2 (동적 IP 설정)

참고자료

- https://www.cisco.com/c/en/us/support/docs/security-vpn/ipsec-architecture-implementation/118048-technote-ipsec-00.html


1. 인터페이스 구성(Lan, Wan)

  • 외부 인터페이스는 보통 공인IP를 사용합니다.
  • 보통 Loopback 인터페이스를 만들어서 터널 사용
interface GigabitEthernet0/0
 description ## 외부 및 터널 IP ##
 ip address 172.17.1.2 255.255.255.252
 no shutdown
!
interface GigabitEthernet0/1
 description ## 내부 서버 IP ##
 ip address 192.168.1.1 255.255.255.0
 no shutdown


2. ISAKMP(IKEv1) 정책 구성

  • crypto isakmp policy <priority> : 우선순위
  • encr aes 192 : 고급 암호화 192 bits.
  • authentication pre-share : 사전 공유키 [default]
  • group 2 : Group 2 (1024-bit)
  • hash : sha (default)
  • lifetime : (86400 seconds = default)
crypto isakmp policy 10
 encr aes 192
 authentication pre-share
 group 2


3. 암호화 ISAKMP 키 구성

  • crypto isakmp key <key 값> address <모든대역 IP>
crypto isakmp key auhjinsu123 address 0.0.0.0


4. VPN 트래픽에 대한 ACL 구성

  • 터널을 위한 ACL 설정
access-list 100 remark tunnel ACL
access-list 100 permit gre host 172.17.1.2 host 172.17.1.1


5. transform-set 구성

  • 보안 프로토콜과 알고리즘 설정
  • crypto ipsec transform-set <Set-Name>
crypto ipsec transform-set auhjinsu esp-aes 192 esp-sha-hmac
 mode tunnel


6. Crypto Dynamic-map 생성, crypto map 생성 후 인터페이스 설정

  • crypto dynamic-map <Map Name> <Number>
  • set transform-set <transform-set Name>
crypto dynamic-map jinsu 10
 set transform-set auhjinsu
  • crypto map <Map Name> <Number> ipsec-isakmp dynamic <dynamic-map Name>
crypto map jinsu_map 10 ipsec-isakmp dynamic jinsu
  • 터널 맺을 외부 인터페이스에 Map 설정
  • crypto map <Map Name>
interface GigabitEthernet0/0
 crypto map jinsu_map


7. 터널 인터페이스 설정

  • interface Tunnel<Number>
  • ip address <Tunnel IP>
  • tunnel source <외부 IP>
  • tunnel destination <상대방 source IP>
interface Tunnel12345
 ip address 10.255.100.2 255.255.255.252
 no ip redirects
 ip mtu 1400
 keepalive 3 3
 tunnel source 172.17.1.2
 tunnel destination 172.17.1.1


반응형

'Network > CISCO' 카테고리의 다른 글

[Network] CISCO - Switch MAC차단 설정  (1) 2023.10.08
[Network] CISCO - IPSEC (IKEv2) 설정  (0) 2023.10.08
[Network] CISCO - MTU 설정  (0) 2022.07.24
[Network] CISCO - EtherChannel 설정  (0) 2022.07.24
[Network] CISCO - 기능 설정  (0) 2022.02.18
반응형

Track 설정

  • 원하는 인터페이스를 체크하여 조건이 맞으면 다른 인터페이스를 Down 시켜주는 기능
  • Track 1이 up 상태 시 down, down 상태 시 up
  • Track 2이 up 상태 시 down, down 상태 시 up
  • and 조건으로 Track 1, 2가 둘다 down상태 시 eix0 터널 인터페이스 다운 설정
예시

체크할 인터페이스 Track 설정
(config)# track 1 interface eth1
(config)# track 2 interface eth2

Track 1,2를 and 조건으로 체크 설정
(config)# track 10 list Boolean and
(config)# object 1 not
(config)# object 2 not

인터페이스에 track 설정
(config)# interface eix0
(config-if)# shutdown track 10


NAT 설정

  • Source NAT - 최종 경로를 지정한 후 패킷이 목적지로 나갈때 Source IP를 변경해서 나감
  • 나가는 인터페이스가 2개 일때 nat source에 두개 설정
  • NAT source에 auto 대신 NAT될 IP 설정 가능
  • source, destination에 network-list 적용 가능
# 사용자 192.168.1.100 -> (eth2)/NEXG VPN/(eth1) -> 서버 10.10.10.10
# 192.168.1.100 -> eth1 인터페이스 IP로 바뀌어서 나간다.

(config)# ip nat 10
(config-ip-nat)# source host 192.168.1.100
(config-ip-nat)# destination host 10.10.10.10
(config-ip-nat)# nat source eth1 auto


  • Destination NAT - 패킷이 들어올때 바로 Destination IP를 변경 함
# 사용자 192.168.1.100 -> (eth2)/NEXG VPN/(eth1) -> 서버 10.10.10.10
# 갈때는 192.168.1.100으로 나갔지만 상대방 패킷이 들어올때 192.168.1.200으로 NAT된다.

(config)# ip nat 10
(config-ip-nat)# source host 192.168.1.100
(config-ip-nat)# destination host 10.10.10.10
(config-ip-nat)# nat destination 192.168.1.200


반응형

'VPN > NEXG' 카테고리의 다른 글

[NEXG] 방화벽 보안(Firewall) 설정  (0) 2023.02.26
[NEXG] 정책 라우팅(Policy Based Routing) 설정  (0) 2023.02.26
[NEXG] Offloading 설정 (Config)  (0) 2023.02.26
[NEXG] 기본 설정(Config)  (0) 2023.02.26
반응형


1. Phase-2 상태가 UP 인가 ?


VPN Tunnel list 조회

# diagnose vpn tunnel list


  • No (SA=0) Down 상태


  • YES (SA=1) Up 상태


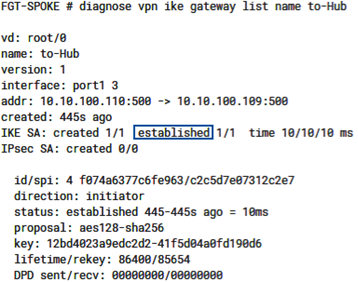
2. IKE Phase-1 상태가 UP 인가 ?


VPN IKE list 조회

# diagnose vpn ike gateway list


  • No (Connecting) Down 상태

  • Yes (Established) Up 상태


3.  체크리스트 확인

  • VPN 장비에 다른 방화벽이 있나요?
  • VPN 게이트웨이가 올바른 외부 인터페이스를 사용하도록 구성되어 있나요?
  • 상대방 공인 IP가 올바르게 구성되어 있습니까?
  • 외부 인터페이스에서 패킷 캡처를 실행하고 원격 피어에서 트래픽을 볼 수 있는지 확인합니다.
  • 포트 500/4500의 IKE 트래픽이 업스트림에 연결된 네트워크 디바이스에서 허용되는지 확인합니다


트래픽 확인 (IP, Port)

# diagnose sniffer packet any '<remote-peer-ip> and port (500 or 4500)' 6 0 l


Debug 확인

# diagnose debug console timestamp enable  
# diagnose debug application Ike -1
# diagnose debug enable


Phase 1은 established 상태인데 Phase 2가 Down 일때

  • 암호화 및 해시 알고리즘이 상대방 장비와 일치하는지 확인합니다.
  • PFS가 활성화되어 있는지 확인하고, 활성화되어 있으면 두 장치 모두에서 구성이 일치하는지 확인합니다.

Perfect Forward Secrecy (PFS)

기본적으로 Phase 2 key는 phase 1에서 생성된 세션 키에서 파생됩니다. PFS(Perfect Forward Secrecy)는 터널이 시작될 때와 Phase 2 key 수명이 만료될 때마다 새로운 Diffie-Hellman 교환을 강제로 수행하여 매번 새 키가 생성되도록 합니다. 이렇게 하면 Phase 2에서 생성된 키가 Phase 1 Key 또는 Phase 2에서 자동으로 생성된 다른 키와 관련이 없습니다.


  • quick mode selectors 가 양쪽간 일치하는지 확인합니다.
  • Phase-2가 여전히 작동하지 않는 경우 포트 500/4500에서 패킷 캡처를 실행하고 다음 명령을 실행합니다.
# diagnose vpn ike gateway list (or diagnose vpn ike gateway list name <tunnel-name>)
# diagnose debug console timestamp enable  
# diagnose debug application ike -1
# diagnose debug enable


반응형
반응형


2023.10.03

드디어 작년부터 준비하던 CKA시험을 응시하고 취득을 완료했다.

22년 사이버 먼데이때 50% 할인을 받아서 신청을했다. 정가 $ 395달러 기준 ($ 197.50)

생각보다 어렵지 않았던거 같다.


  •  접수 사이트

https://training.linuxfoundation.org/certification/certified-kubernetes-administrator-cka/


공부 참고 사이트

1. 뭄샤드 강의

2. kubernets 공식 문서

3. KodeKloud(뭄샤드 실습)

4. Killer.sh (자격증 접수하면 2회 가능, 마지막 날 풀어보기 반복, 실제 시험보다 어려움)


중요하지않지만 간단한 꿀팁 !

1. 간단하게 배점 먹고들어갈 수 있는 jsonpath 사용법 배우기

2. kubectl cheat sheet 어느정도 배우고 가기

 - https://kubernetes.io/docs/reference/kubectl/cheatsheet/

3. 북마크를 이용해서 쿠버네티스 문서 yaml 파일 빨리 만들기

4. 시험 시작할때 무조건 context 수정하기 꼭! 꼭! 꼭!

5. 시험 원격화면이 굉장히 작으므로 해상도 큰거 사용하기

6. 시험환경은 많이 개선되어서 생각보다 빠르고 쾌적


시험에 나온 문제 (기억나는 부분만...)

1. 현재 사용가능한 Node들의 정보 출력 및 저장 ( Node Name, Taint=NoSchedule, 사용가능 list)

2. 현재 사용중인 Pods중에 특정 Label 가지고있는 Pods 출력 및 저장

3. Stateful Scale size 조절 

4. Deploy Scale Size 조절, Deploy된 Pods들의 image update

5. 현재 사용중인 Controlplane node만 Cluster upgrade 하기 (Kubeadm, Kubelet, Kubectl)

6. 하나의 Pod에서 2개 Container사용 (Sidecar, EmptyDir)

7. Deployment 생성, Pods 생성 간단한 생성 등등..

8. 사용자 Rule, Rulebinding, Serviceaccount 생성 및 binding 작업

9. ClusterRule, ClusterRulebinding 연동 설정

10. Storage 관련 Pod에 PV, PVC 생성 및 연동

11. 배점이 제일 높은 Node Troubleshooting 문제


다음 목표는 11월 말까지 CKAD 취득 !!

레쓰꼬  !!


반응형
반응형


2023.06.06

★ 클러스터에 몇 개의 clusterrole이 정의되어 있나요?

-> 69개

controlplane ~ ➜  kubectl get clusterrole --no-headers | wc -l
69

controlplane ~ ➜


클러스터에 몇 개의 clusterrolebindings이 존재하나요?

-> 54개

controlplane ~ ➜  kubectl get clusterrolebindings --no-headers | wc -l
54

controlplane ~ ➜


cluster-admin clusterrole은 어떤 네임스페이스에 속하나요?

-> 클러스터 역할은 클러스터 전체에 속하며 네임스페이스의 일부가 아니다.

controlplane ~ ➜  kubectl describe clusterrole cluster-admin 
Name:         cluster-admin
Labels:       kubernetes.io/bootstrapping=rbac-defaults
Annotations:  rbac.authorization.kubernetes.io/autoupdate: true
PolicyRule:
  Resources  Non-Resource URLs  Resource Names  Verbs
  ---------  -----------------  --------------  -----
  *.*        []                 []              [*]
             [*]                []              [*]

controlplane ~ ➜


cluster-admin 역할은 어떤 사용자/그룹에 바인딩되나요?

-> Group  system:masters

controlplane ~ ➜  kubectl describe clusterrolebinding cluster-admin 
Name:         cluster-admin
Labels:       kubernetes.io/bootstrapping=rbac-defaults
Annotations:  rbac.authorization.kubernetes.io/autoupdate: true
Role:
  Kind:  ClusterRole
  Name:  cluster-admin
Subjects:
  Kind   Name            Namespace
  ----   ----            ---------
  Group  system:masters  

controlplane ~ ➜


cluster-admin 역할은 어떤 수준의 권한을 부여하나요?

-> 클러스터의 모든 리소스에 대해 모든 작업 수행

controlplane ~ ➜  kubectl describe clusterrole cluster-admin 
Name:         cluster-admin
Labels:       kubernetes.io/bootstrapping=rbac-defaults
Annotations:  rbac.authorization.kubernetes.io/autoupdate: true
PolicyRule:
  Resources  Non-Resource URLs  Resource Names  Verbs
  ---------  -----------------  --------------  -----
  *.*        []                 []              [*]
             [*]                []              [*]

controlplane ~ ➜


새로운 사용자 미셸이 팀에 합류했습니다. 그녀가 노드에 액세스할 수 있도록 필요한 ClusterRoles 및 ClusterRoleBinding을 만듭니다.

-> 기존 cluster-admin 을 yaml 파일로 복사

controlplane ~ ➜ kubectl get clusterrole cluster-admin -o yaml > michelle.yaml
controlplane ~ ➜

-> 복사한 yaml 파일 확인

controlplane ~ ➜  cat michelle.yaml 
apiVersion: rbac.authorization.k8s.io/v1
kind: ClusterRole
metadata:
  annotations:
    rbac.authorization.kubernetes.io/autoupdate: "true"
  creationTimestamp: "2023-06-06T07:08:22Z"
  labels:
    kubernetes.io/bootstrapping: rbac-defaults
  name: cluster-admin
  resourceVersion: "68"
  uid: 0d93b435-10ba-475e-ae77-d46510f93d75
rules:
- apiGroups:
  - '*'
  resources:
  - '*'
  verbs:
  - '*'
- nonResourceURLs:
  - '*'
  verbs:
  - '*'

-> 복사한 yaml 파일 수정

controlplane ~ ➜  cat michelle.yaml 
apiVersion: rbac.authorization.k8s.io/v1
kind: ClusterRole
metadata:
  name: node-admin
rules:
- apiGroups: [""]
  resources: ["nodes"]
  verbs: ["get", "watch", "list", "create", "delete"]

controlplane ~ ➜

->  새로운 clusterrole 생성

controlplane ~ ➜  kubectl create -f michelle.yaml 
clusterrole.rbac.authorization.k8s.io/node-admin created

controlplane ~ ➜

-> clusterrolebinding 복사

controlplane ~ ➜  kubectl get clusterrolebinding system:basic-user -o yaml > michelle-binding.yaml

controlplane ~ ➜

-> 내용 확인

controlplane ~ ➜  cat michelle-binding.yaml 
apiVersion: rbac.authorization.k8s.io/v1
kind: ClusterRoleBinding
metadata:
  annotations:
    rbac.authorization.kubernetes.io/autoupdate: "true"
  creationTimestamp: "2023-06-06T07:08:24Z"
  labels:
    kubernetes.io/bootstrapping: rbac-defaults
  name: system:basic-user
  resourceVersion: "138"
  uid: 8ec82b9d-2758-4347-a0d2-25ac08eb17b6
roleRef:
  apiGroup: rbac.authorization.k8s.io
  kind: ClusterRole
  name: system:basic-user
subjects:
- apiGroup: rbac.authorization.k8s.io
  kind: Group
  name: system:authenticated

controlplane ~ ➜

-> 내용 수정

controlplane ~ ➜  cat michelle-binding.yaml 
apiVersion: rbac.authorization.k8s.io/v1
kind: ClusterRoleBinding
metadata:
  name: michelle-binding
roleRef:
  apiGroup: rbac.authorization.k8s.io
  kind: ClusterRole
  name: node-admin
subjects:
- apiGroup: rbac.authorization.k8s.io
  kind: User
  name: michelle

controlplane ~ ➜

-> clusterrolebinding 생성

controlplane ~ ➜  kubectl create -f michelle-binding.yaml 
clusterrolebinding.rbac.authorization.k8s.io/michelle-binding created

controlplane ~ ➜


미셸의 책임이 커지면서 이제 그녀는 스토리지도 담당하게 됩니다. 그녀가 스토리지에 액세스할 수 있도록 필요한 ClusterRoles과 clusterrolebinding을 생성한다.

-> stroage-admin 룰 생성

controlplane ~ ➜  kubectl create clusterrole storage-admin --resource=persistentvolumes,storageclasses --verb=get,list,create,delete,watch
clusterrole.rbac.authorization.k8s.io/storage-admin created

controlplane ~ ➜

-> 룰 확인

controlplane ~ ➜  kubectl describe clusterrole storage-admin 
Name:         storage-admin
Labels:       <none>
Annotations:  <none>
PolicyRule:
  Resources                      Non-Resource URLs  Resource Names  Verbs
  ---------                      -----------------  --------------  -----
  persistentvolumes              []                 []              [get list create delete watch]
  storageclasses.storage.k8s.io  []                 []              [get list create delete watch]

controlplane ~ ➜

-> michelle-stroage-admin 생성

controlplane ~ ➜  kubectl create clusterrolebinding michelle-storage-admin --user=michelle --clusterrole=storage-admin

clusterrolebinding.rbac.authorization.k8s.io/michelle-storage-admin created

controlplane ~ ➜

-> 룰 확인

controlplane ~ ➜  kubectl describe clusterrolebindings michelle-storage-admin 
Name:         michelle-storage-admin
Labels:       <none>
Annotations:  <none>
Role:
  Kind:  ClusterRole
  Name:  storage-admin
Subjects:
  Kind  Name      Namespace
  ----  ----      ---------
  User  michelle  

controlplane ~ ➜


반응형

+ Recent posts